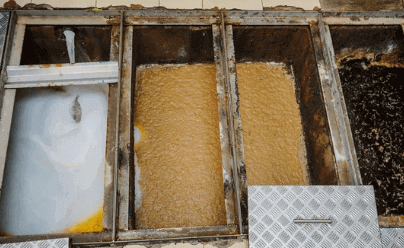
Clogs, offensive odors, and potential health risks can all be avoided with regular cleaning of grease traps. We’ll take you step-by-step through the process of cleaning your grease trap in this comprehensive guide.
Grease Trap Cleaning Steps:
You can make sure your kitchen runs well and that you are in accordance with local laws by following these instructions.
Step 1: Gather the Required Tools and Equipment
The following tools and supplies should be gathered before you start cleaning your grease trap:
Self protection:
Put on gloves, goggles, and a protective apron to keep yourself safe.
Scraper:
Clear the oil accumulation and solid material from the trap with a strong scraper.
Solution for cleaning grease traps:
Choose a grease trap-safe cleaner that is enzyme-based or biodegradable.
A biodegradable:
Prepare a container to hold the waste items and grease.
Long-handled brush:
Scrub the trap well using a long-handled brush.

Step 2: Turn off the grease trap:
To avoid any mishaps or malfunctions when cleaning, find the main power switch and shut off the grease trap. Your top focus should always be your safety.
Step 3: Get Rid of Solid Waste
Carefully remove any solid waste from the grease trap, including food particles and big chunks of grease, using the scraper. To dispose of the debris properly, put it in the bucket.

Step 4: Remove Extra Water
Drain any extra water from the grease trap using a bucket or a similar container. This action will make it simpler to get to the trap and clean it.
Step 5: Apply the Grease Trap Cleaning Solution
Apply the chosen grease trap cleaning solution as directed by the manufacturer. Make sure the cleaner touches the walls and baffles in addition to every part of the trap. To effectively break down the grease and get rid of odors, give the solution the appropriate amount of time to sit.
Step 6: Clean the trap by scrubbing it.
Scrub the internal surfaces of the grease trap thoroughly with a long-handled brush. Pay close attention to the baffles, walls, and other challenging to access places. Any lingering oil or accumulation will be assisted by the brush.
Step 7: Rinse the grease trap:
After cleaning, rinse the grease trap with hot water to get rid of any dirt or cleaning agent that may have remained. Make sure the trap is properly emptied out of dirt and cleaning solutions.
Step 8: Put the Grease Trap back together and turn it on.
Reassemble any separated parts after thoroughly cleaning and rinsing the grease trap. Verify once more that everything has been properly sealed and reinstalled. Check the grease trap’s operation by turning it on.
Step 9: Getting Rid of Waste Materials Correctly
Dispose of the garbage, grease, and wastewater gathered in accordance with local laws. To ensure adherence to environmental regulations, get in touch with the proper garbage disposal services in Houston, Texas.
Conclusion:
For a commercial kitchen in Houston, Texas or anywhere to run smoothly, routine grease trap cleaning and maintenance are essential. You may effectively clean your grease trap, avoid clogs, and stay in compliance with local laws by following this step-by-step manual. Throughout the cleaning procedure, keep safety a priority, and dispose of waste items properly. A grease-free grease trap will make the cooking atmosphere safer and more effective.
Bright & Smart commercial cleaning company provides all types of commercial cleaning services including post construction cleaning, carpet cleaning, floor cleaning and janitorial services. Get in Touch Today to receive a discount coupon and amazing cleaning service.


